
“Mindful drawing” with Monika
PROJECT 1 – GROWING IN HARMONY
Materials: Canson heavy weight paper, Japanese brush pens and ink
This project is inspired by the love for this unique flower and to celebrate its delicate feeling, as a symbol of growth and looking forward to new experiences approaching life with harmony.
When you draw this flower, think about what you would like to do in your life and what gives you joy. You can go in your garden or to a park and look around noticing the plants and see what feeling you have before coming back to you drawing. The curved strokes in this project will help you to unfold feelings that reflect on harmony in nature.
Method:
Start by drawing a thin stroke from the top corner going down, creating a curve in the middle of your stroke.
Add another curved line from the top corner of the previous one, nearly joining the lines at the end.
Create the body of the flower by adding another line going down and joining with the others and a short, curved stroke on the right-hand side on the bottom of it.
Draw two thin lines for the stem and a small oval shaped line for the pistil.
Continue by starting the new flower on the left with a delicate and curved line, starting at the level of the final part of the first flower.
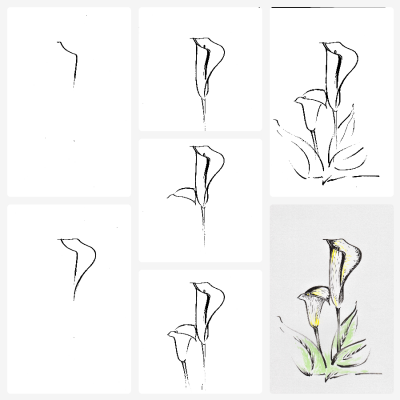
6. Complete the top part with another curved line joining to end it pointed.
7. Then add two strokes for the body of the flower.
8. And two thin lines for the stem
9. Draw the leaves. I have done three of them but feel free to make it personal and follow your feelings also in term of the angle and movement.
10. Add more details and texture using ink or a brush pen to have simple veins on the leaves and create contrast on the flowers. Use your imagination.
11. Complete it by using some colours, just a gentle touch with some green and yellow or you can colour the flowers with any other colour that you like or resonate with you.
PROJECT 2 – INNER BEAUTY
Materials: Canson heavy weight paper, traditional Japanese brush pen with ink.
This project is inspired by any form of beauty and interpretation of it in term of love, care, and mindfulness. The swan is for me a bird of evident but also mysterious beauty and delicacy.
When you work on this piece, focus on the intention of letting go and feeling completely loved and relaxed. The movement of the strokes you will create will guide you through a journey of inner beauty which I hope will leave you with awareness and clarity and a calm feeling. You could look at any water feature around you or sensing and hearing the water flowing. Or even look at the clouds and their formation which can often resemble the light effect of wings. It will bring you a sense of peace, guiding you into creating the movement of this water bird. It is also always positive to take three deep breaths before starting.
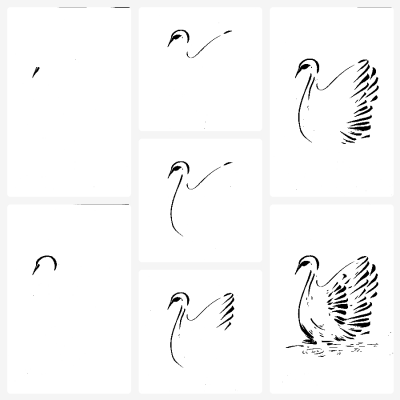
Method:
Start by drawing two short lines joining down to create the bill.
Add a round stroke from the bill without touching the end of the bill on the other side.
For the end of the bill, draw an almond shapes stroke to create the eye and add a small flick at the end. It just emphasizes the shape and movement of the eye.
Draw a curved and delicate line following the movement of the head but leaving a gap between the two. The strokes do not touch. Start noticing how you feel drawing these so curved and fluid lines.
Draw another curved line down from the end of the eye as part of the body.
6. Add another fluid line to accentuate the shape of the neck and then move your attention to the feather. When you create these strokes take a breath for each of them and press more on the middle of your stroke to create short ones that have various thicknesses. It helps being not too slow or not to quick either but finding a balance in the action of the strokes to be as natural as possible and reflecting your own feelings.
7. Continue the same way and with the same approach to draw more feather on the bottom. Keep focusing on the act of this movement, the stroke will come naturally to you.
8. Add few shorter and delicate strokes on the outside but close enough to the others to create a balanced effect.
9. Complete the feathers by adding some inside the body creating a balance. The strokes will be delicate and strong at the same time and that is the beauty of it.
10. You can draw some thin and interrupted lines on the base and some curly ones, like spirals to give the sense of water. Keep it personal and follow your feeling to complete your drawin
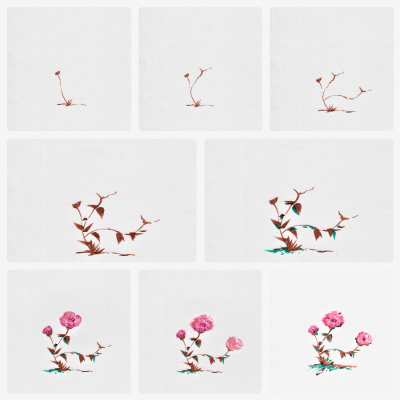
PROJECT 3 – KINDNESS
Materials: Canson heavy weight paper, Pigma Japanese brush pen and fudenosuke pen.
This project is inspired by any form of kindness that we can find. Kindness in nature, in people, in our heart. It is a reflection on the importance of being kind.
When you draw this composition feel the kindness in you and how it can inspire you. Always remember the continuity of strokes and the fluidity in capturing nature in that moment.
Method:
- Start with the first branch on the left using light brown by using the brush or brush pen very gently to have a very thin delicate line. Add an imprecise stroke, just like a large dot, at the end.
Draw a second branch on the right and as you can see, I have created an interrupted line by stop and releasing the bush. You can do a continuous line if easier, but I wanted to show you the effect.
Add the last branch, drawing a lower curved line keeping the balance between all of them and the composition. Again, the lines are very delicate and thin.
Still using brown draw the leaves around each branch in the way you like but trying to maintain a natural balance. The effect is created by pressing the brush and slowly release it to keep a large but pointed shape.
5. Add some irregular strokes using green around the leaves and branches.
6. Start drawing the first two flowers with light pink giving a round soft shape and then add some details in darker pink or magenta. (you can use any tone you like for the flowers. Whatever resonate with you at that moment)
7. Draw last flower on the right with simple irregular but close strokes to give a round effect but not too precise.
8. Add some details with another colour and add more stroke on the ground.
9. Refine the composition using more green and some touches of black to create contrast and character.
Content and images by Monika Cilmi